10 july-15 july
What is CSS?
- CSS stands for Cascading Style Sheets
- CSS describes how HTML elements are to be displayed on screen, paper, or in other media
- CSS saves a lot of work. It can control the layout of multiple web pages all at once
- External stylesheets are stored in CSS files
Why Use CSS?
CSS is used to define styles for your web pages, including the design, layout and variations in display for different devices and screen sizes.
CSS Syntax
A CSS rule-set consists of a selector and a declaration block:
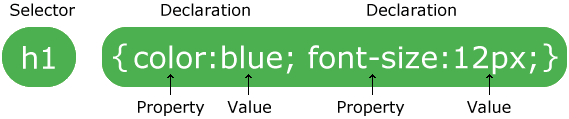
The selector points to the HTML element you want to style.
The declaration block contains one or more declarations separated by semicolons.
Each declaration includes a CSS property name and a value, separated by a colon.
A CSS declaration always ends with a semicolon, and declaration blocks are surrounded by curly braces.
In the following example all <p> elements will be center-aligned, with a red text color:
<!DOCTYPE html>
<html>
<head>
<style>
p {
color: red;
text-align: center;
}
</style>
</head>
<body><p>Hello World!</p>
<p>These paragraphs are styled with CSS.</p></body>
</html>
Output:-

Three Ways to Insert CSS
There are three ways of inserting a style sheet:
External Style Sheet
With an external style sheet, you can change the look of an entire website by changing just one file!
Each page must include a reference to the external style sheet file inside the <link> element. The <link> element goes inside the <head> section:
<!DOCTYPE html>
<html>
<head>
<link rel=”stylesheet” type=”text/css” href=”mystyle.css”>
</head>
<body><h1>This is a heading</h1>
<p>This is a paragraph.</p></body>
</html>
Output:-

An external style sheet can be written in any text editor. The file should not contain any html tags. The style sheet file must be saved with a .css extension.
Here is how the “mystyle.css” looks:
body {
background-color: lightblue;
}h1 {
color: navy;
margin-left: 20px;
}
margin-left: 20 px;). The correct way is: margin-left: 20px;Internal Style Sheet
An internal style sheet may be used if one single page has a unique style.
Internal styles are defined within the <style> element, inside the <head> section of an HTML page:
<!DOCTYPE html>
<html>
<head>
<style>
body {
background-color: linen;
}
h1 {
color: maroon;
margin-left: 40px;
}
</style>
</head>
<body><h1>This is a heading</h1>
<p>This is a paragraph.</p></body>
</html>
Output:-

Inline Styles
- An inline style may be used to apply a unique style for a single element.
- To use inline styles, add the style attribute to the relevant element. The style attribute can contain any CSS property.
The example below shows how to change the color and the left margin of a <h1> element:
<!DOCTYPE html>
<html>
<body><h1 style=”color:blue;margin-left:30px;”>This is a heading</h1>
<p>This is a paragraph.</p></body>
</html>
Output:-

CSS Padding
The CSS padding properties are used to generate space around an element’s content, inside of any defined borders.
With CSS, you have full control over the padding. There are properties for setting the padding for each side of an element (top, right, bottom, and left).
Padding – Individual Sides
CSS has properties for specifying the padding for each side of an element:
padding-toppadding-rightpadding-bottompadding-left
All the padding properties can have the following values:
- length – specifies a padding in px, pt, cm, etc.
- % – specifies a padding in % of the width of the containing element
- inherit – specifies that the padding should be inherited from the parent element
Note: Negative values are not allowed.
The following example sets different padding for all four sides of a
element:
div {
border: 1px solid black;
background-color: lightblue;
padding-top: 50px;
padding-right: 30px;
padding-bottom: 50px;
padding-left: 80px;
}Using individual padding properties
hello</body>
</html>
Output:-

Padding – Shorthand Property
To shorten the code, it is possible to specify all the padding properties in one property.
The padding property is a shorthand property for the following individual padding properties:
padding-toppadding-rightpadding-bottompadding-left
So, here is how it works:
If the padding property has four values:
- padding: 25px 50px 75px 100px;
- top padding is 25px
- right padding is 50px
- bottom padding is 75px
- left padding is 100px
<!DOCTYPE html>
<html>
<head>
<style>
div {
border: 1px solid black;
padding: 25px 50px 75px 100px;
background-color: lightblue;
}
</style>
</head>
<body><h2>The padding shorthand property – 4 values</h2>
This div element has a top padding of 25px, a right padding of 50px, a bottom padding of 75px, and a left padding of 100px.</body>
</html>
Output:-

CSS Forms
<!DOCTYPE html>
<html>
<style>
input[type=text], select {
width: 100%;
padding: 12px 20px;
margin: 8px 0;
display: inline-block;
border: 1px solid #ccc;
border-radius: 4px;
box-sizing: border-box;
}input[type=submit] {
width: 100%;
background-color: #4CAF50;
color: white;
padding: 14px 20px;
margin: 8px 0;
border: none;
border-radius: 4px;
cursor: pointer;
}input[type=submit]:hover {
background-color: #45a049;
}div {
border-radius: 5px;
background-color: #f2f2f2;
padding: 20px;
}
</style>
<body><h3>Using CSS to style an HTML Form</h3>
First Name
Last Name
Country
Australia
Canada
USA</body>
</html>
Output:-

Styling Input Fields
Use the width property to determine the width of the input field:
First Name
<!DOCTYPE html>
<html>
<head>
<style>
input {
width: 100%;
}
</style>
</head>
<body><p>A full-width input field:</p>
<form>
<label for=”fname”>First Name</label>
<input type=”text” id=”fname” name=”fname”>
</form></body>
</html>
Output:-
A full-width input field:
First Name
The example above applies to all <input> elements. If you only want to style a specific input type, you can use attribute selectors:
input[type=text]– will only select text fieldsinput[type=password]– will only select password fieldsinput[type=number]– will only select number fields- etc..
Bordered Inputs
Use the border property to change the border size and color, and use the border-radius property to add rounded corners:
<!DOCTYPE html>
<html>
<head>
<style>
input[type=text] {
width: 100%;
padding: 12px 20px;
margin: 8px 0;
box-sizing: border-box;
border: 2px solid red;
border-radius: 4px;
}
</style>
</head>
<body><p>Text fields with borders:</p>
<form>
<label for=”fname”>First Name</label>
<input type=”text” id=”fname” name=”fname”>
<label for=”lname”>Last Name</label>
<input type=”text” id=”lname” name=”lname”>
</form></body>
</html>
Output:-

Styling Input Buttons
<!DOCTYPE html>
<html>
<head>
<style>
input[type=button], input[type=submit], input[type=reset] {
background-color: #4CAF50;
border: none;
color: white;
padding: 16px 32px;
text-decoration: none;
margin: 4px 2px;
cursor: pointer;
}
</style>
</head>
<body><p>Styled input buttons.</p>
<input type=”button” value=”Button”>
<input type=”reset” value=”Reset”>
<input type=”submit” value=”Submit”></body>
</html>
Output:-
Styled input buttons.
