17 july – 22 july
What is JDBC?
JDBC stands for Java Database Connectivity, which is a standard Java API for database-independent connectivity between the Java programming language and a wide range of databases.
The JDBC library includes APIs for each of the tasks mentioned below that are commonly associated with database usage.
- Making a connection to a database.
- Creating SQL or MySQL statements.
- Executing SQL or MySQL queries in the database.
- Viewing & Modifying the resulting records.
Fundamentally, JDBC is a specification that provides a complete set of interfaces that allows for portable access to an underlying database. Java can be used to write different types of executables, such as −
- Java Applications
- Java Applets
- Java Servlets
- Java ServerPages (JSPs)
- Enterprise JavaBeans (EJBs).
All of these different executables are able to use a JDBC driver to access a database, and take advantage of the stored data.
JDBC provides the same capabilities as ODBC, allowing Java programs to contain database-independent code.
Pre-Requisite
Before moving further, you need to have a good understanding of the following two subjects −
- Core Java Programming
- SQL or MySQL Database
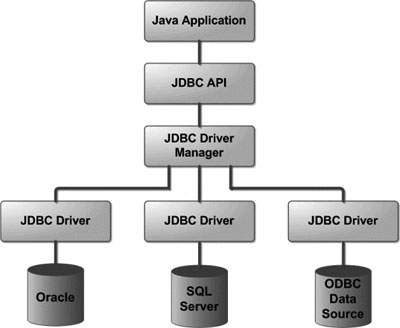
JDBC Architecture
The JDBC API supports both two-tier and three-tier processing models for database access but in general, JDBC Architecture consists of two layers −
- JDBC API: This provides the application-to-JDBC Manager connection.
- JDBC Driver API: This supports the JDBC Manager-to-Driver Connection.
The JDBC API uses a driver manager and database-specific drivers to provide transparent connectivity to heterogeneous databases.
The JDBC driver manager ensures that the correct driver is used to access each data source. The driver manager is capable of supporting multiple concurrent drivers connected to multiple heterogeneous databases.
Following is the architectural diagram, which shows the location of the driver manager with respect to the JDBC drivers and the Java application −
Common JDBC Components
The JDBC API provides the following interfaces and classes −
- DriverManager: This class manages a list of database drivers. Matches connection requests from the java application with the proper database driver using communication sub protocol. The first driver that recognizes a certain subprotocol under JDBC will be used to establish a database Connection.
- Driver: This interface handles the communications with the database server. You will interact directly with Driver objects very rarely. Instead, you use DriverManager objects, which manages objects of this type. It also abstracts the details associated with working with Driver objects.
- Connection: This interface with all methods for contacting a database. The connection object represents communication context, i.e., all communication with database is through connection object only.
- Statement: You use objects created from this interface to submit the SQL statements to the database. Some derived interfaces accept parameters in addition to executing stored procedures.
- ResultSet: These objects hold data retrieved from a database after you execute an SQL query using Statement objects. It acts as an iterator to allow you to move through its data.
- SQLException: This class handles any errors that occur in a database application.
Example to connect to the mysql database in java
For connecting java application with the mysql database, you need to follow 5 steps to perform database connectivity.
In this example we are using MySql as the database. So we need to know following informations for the mysql database:
- Driver class: The driver class for the mysql database is com.mysql.jdbc.Driver.
- Connection URL: The connection URL for the mysql database is jdbc:mysql://localhost:3306/sonoo where jdbc is the API, mysql is the database, localhost is the server name on which mysql is running, we may also use IP address, 3306 is the port number and sonoo is the database name. We may use any database, in such case, you need to replace the sonoo with your database name.
- Username: The default username for the mysql database is root.
- Password: Password is given by the user at the time of installing the mysql database. In this example, we are going to use root as the password.
Let’s first create a table in the mysql database, but before creating table, we need to create database first.
create database sonoo;
use sonoo;
create table emp(id int(10),name varchar(40),age int(3));
Example to Connect Java Application with mysql database
In this example, sonoo is the database name, root is the username and password.
The above example will fetch all the records of emp table.
SESSION:-
Session is used to maintain same state between several webpages and also used to make the variable global.
- It works on server side.
- If a user login in the website then he will remain into session till than he logout from the session.
In this way each user creates their unique id into session.
- It is must to start session on each wegpages.
Example:-
session1.jsp
<body>
<form action=”session2.jsp”>
Username<input type=”text” name=”username” value=”username” size=”20″/>
<input type=”submit” value=”submit”/>
</form>
</body>
session2.jsp
<h2><%
String s1=(string)request.getParameter(“username”);
Session.SetAttribute(“User”,s1);
out.println(“welcome”+s1);
%>
<a href=”session3.jsp” target=”blank”>visit next page</a>
</h2>
session3.jsp
<%
String s1=(string)session.getAttribute(“username”);
out.println(“welcome”+s1);
%>
<a href=”session4.jsp” target=”blank”>visit next page</a>
session4.jsp
<%
String s1=(string)session.getAttribute(“username”);
out.println(“welcome”+s1);
%>
<a href=”session5.jsp” target=”blank”>logout</a>
session5
<%
session.removeAtrribute(“user”);
response.sendRedirect(“session1.jsp”);
%>
