24 july -29 july
It stands for JavaServer Pages.
JSP technology is used to create web application just like Servlet technology. It can be thought of as an extension to servlet because it provides more functionality than servlet such as expression language, jstl etc.
A JSP page consists of HTML tags and JSP tags. The jsp pages are easier to maintain than servlet because we can separate designing and development. It provides some additional features such as Expression Language, Custom Tag etc.
Advantages of JSP
Following table lists out the other advantages of using JSP over other technologies −
vs. Active Server Pages (ASP)
The advantages of JSP are twofold. First, the dynamic part is written in Java, not Visual Basic or other MS specific language, so it is more powerful and easier to use. Second, it is portable to other operating systems and non-Microsoft Web servers.
vs. Pure Servlets
It is more convenient to write (and to modify!) regular HTML than to have plenty of println statements that generate the HTML.
vs. Server-Side Includes (SSI)
SSI is really only intended for simple inclusions, not for “real” programs that use form data, make database connections, and the like.
vs. JavaScript
JavaScript can generate HTML dynamically on the client but can hardly interact with the web server to perform complex tasks like database access and image processing etc.
vs. Static HTML
Regular HTML, of course, cannot contain dynamic information.
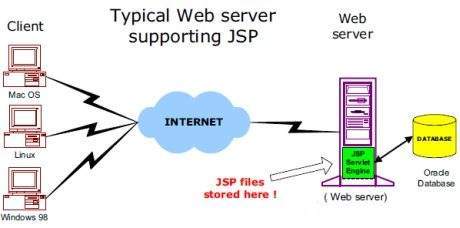
JSP Architecture:-
The web server needs a JSP engine, i.e, a container to process JSP pages. The JSP container is responsible for intercepting requests for JSP pages. This tutorial makes use of Apache which has built-in JSP container to support JSP pages development.
A JSP container works with the Web server to provide the runtime environment and other services a JSP needs. It knows how to understand the special elements that are part of JSPs.
Following diagram shows the position of JSP container and JSP files in a Web application.
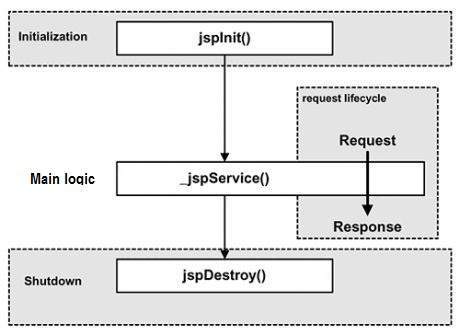
JSP-Lifecycle:-
A JSP life cycle is defined as the process from its creation till the destruction. This is similar to a servlet life cycle with an additional step which is required to compile a JSP into servlet.
Paths Followed By JSP
The following are the paths followed by a JSP −
- Compilation
- Initialization
- Execution
- Cleanup
The four major phases of a JSP life cycle are very similar to the Servlet Life Cycle. The four phases have been described below −
JSP Compilation
When a browser asks for a JSP, the JSP engine first checks to see whether it needs to compile the page. If the page has never been compiled, or if the JSP has been modified since it was last compiled, the JSP engine compiles the page.
The compilation process involves three steps −
- Parsing the JSP.
- Turning the JSP into a servlet.
- Compiling the servlet.
JSP Initialization
When a container loads a JSP it invokes the jspInit() method before servicing any requests. If you need to perform JSP-specific initialization, override the jspInit() method −
public void jspInit(){
   // Initialization code...
}
Typically, initialization is performed only once and as with the servlet init method, you generally initialize database connections, open files, and create lookup tables in the jspInit method.
JSP Execution
This phase of the JSP life cycle represents all interactions with requests until the JSP is destroyed.
Whenever a browser requests a JSP and the page has been loaded and initialized, the JSP engine invokes the _jspService() method in the JSP.
The _jspService() method takes an HttpServletRequest and an HttpServletResponse as its parameters as follows −
void _jspService(HttpServletRequest request, HttpServletResponse response) {
   // Service handling code...
}
The _jspService() method of a JSP is invoked on request basis. This is responsible for generating the response for that request and this method is also responsible for generating responses to all seven of the HTTP methods, i.e, GET, POST, DELETE, etc.
JSP Cleanup
The destruction phase of the JSP life cycle represents when a JSP is being removed from use by a container.
The jspDestroy() method is the JSP equivalent of the destroy method for servlets. Override jspDestroy when you need to perform any cleanup, such as releasing database connections or closing open files.
The jspDestroy() method has the following form −
public void jspDestroy() {
   // Your cleanup code goes here.
}
Elements of JSP
The elements of JSP have been described below −
The Scriptlet
A scriptlet can contain any number of JAVA language statements, variable or method declarations, or expressions that are valid in the page scripting language.
Following is the syntax of Scriptlet −
<% code fragment %>
You can write the XML equivalent of the above syntax as follows −
<jsp:scriptlet>
   code fragment
</jsp:scriptlet>
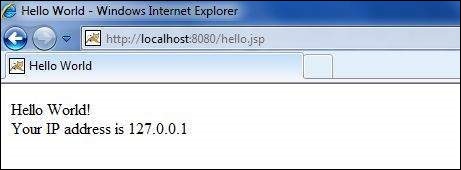
Any text, HTML tags, or JSP elements you write must be outside the scriptlet. Following is the simple and first example for JSP −
<html>
   <head><title>Hello World</title></head>

   <body>
      Hello World!<br/>
      <%
         out.println("Your IP address is " + request.getRemoteAddr());
      %>
   </body>
</html>
NOTE − Assuming that Apache Tomcat is installed in C:\apache-tomcat-7.0.2 and your environment is setup as per environment setup tutorial.
Let us keep the above code in JSP file hello.jsp and put this file in C:\apache-tomcat7.0.2\webapps\ROOT directory. Browse through the same using URL http://localhost:8080/hello.jsp. The above code will generate the following result −
JSP Declarations
A declaration declares one or more variables or methods that you can use in Java code later in the JSP file. You must declare the variable or method before you use it in the JSP file.
Following is the syntax for JSP Declarations −
<%! declaration; [ declaration; ]+ ... %>
You can write the XML equivalent of the above syntax as follows −
<jsp:declaration>
   code fragment
</jsp:declaration>
Following is an example for JSP Declarations −
<%! int i = 0; %>
<%! int a, b, c; %>
<%! Circle a = new Circle(2.0); %>
JSP Expression
A JSP expression element contains a scripting language expression that is evaluated, converted to a String, and inserted where the expression appears in the JSP file.
Because the value of an expression is converted to a String, you can use an expression within a line of text, whether or not it is tagged with HTML, in a JSP file.
The expression element can contain any expression that is valid according to the Java Language Specification but you cannot use a semicolon to end an expression.
Following is the syntax of JSP Expression −
<%= expression %>
You can write the XML equivalent of the above syntax as follows −
<jsp:expression>
   expression
</jsp:expression>
Following example shows a JSP Expression −
<html>
   <head><title>A Comment Test</title></head>

   <body>
      <p>Today's date: <%= (new java.util.Date()).toLocaleString()%></p>
   </body>
</html>
The above code will generate the following result −
Today’s date: 11-Sep-2010 21:24:25
JSP Comments
JSP comment marks text or statements that the JSP container should ignore. A JSP comment is useful when you want to hide or “comment out”, a part of your JSP page. Following is the syntax of the JSP comments −
<%-- This is JSP comment --%>
Following example shows the JSP Comments −
<html>
   <head><title>A Comment Test</title></head>

   <body>
      <h2>A Test of Comments</h2>
      <%-- This comment will not be visible in the page source --%>
   </body>
</html>
The above code will generate the following result −
A Test of Comments
There are a small number of special constructs you can use in various cases to insert comments or characters that would otherwise be treated specially. Here’s a summary −
| S.No. | Syntax & Purpose |
|---|---|
| 1 | <%– comment –%>
A JSP comment. Ignored by the JSP engine. |
| 2 | <!– comment –>
An HTML comment. Ignored by the browser. |
| 3 | <\%
Represents static <% literal. |
| 4 | %\>
Represents static %> literal. |
| 5 | \’
A single quote in an attribute that uses single quotes. |
| 6 | \”
A double quote in an attribute that uses double quotes. |
JSP Directives
A JSP directive affects the overall structure of the servlet class. It usually has the following form −
<%@ directive attribute="value" %>
There are three types of directive tag −
| S.No. | Directive & Description |
|---|---|
| 1 | <%@ page … %>
Defines page-dependent attributes, such as scripting language, error page, and buffering requirements. |
| 2 | <%@ include … %>
Includes a file during the translation phase. |
| 3 | <%@ taglib … %>
Declares a tag library, containing custom actions, used in the page |
We would explain the JSP directive in a separate chapter JSP – Directives
JSP Actions
JSP actions use constructs in XML syntax to control the behavior of the servlet engine. You can dynamically insert a file, reuse JavaBeans components, forward the user to another page, or generate HTML for the Java plugin.
There is only one syntax for the Action element, as it conforms to the XML standard −
<jsp:action_name attribute="value" />
Action elements are basically predefined functions. Following table lists out the available JSP Actions −
| S.No. | Syntax & Purpose |
|---|---|
| 1 | jsp:include
Includes a file at the time the page is requested. |
| 2 | jsp:useBean
Finds or instantiates a JavaBean. |
| 3 | jsp:setProperty
Sets the property of a JavaBean. |
| 4 | jsp:getProperty
Inserts the property of a JavaBean into the output. |
| 5 | jsp:forward
Forwards the requester to a new page. |
| 6 | jsp:plugin
Generates browser-specific code that makes an OBJECT or EMBED tag for the Java plugin. |
| 7 | jsp:element
Defines XML elements dynamically. |
| 8 | jsp:attribute
Defines dynamically-defined XML element’s attribute. |
| 9 | jsp:body
Defines dynamically-defined XML element’s body. |
| 10 | jsp:text
Used to write template text in JSP pages and documents. |
We would explain JSP actions in a separate chapter JSP – Actions
JSP Implicit Objects
JSP supports nine automatically defined variables, which are also called implicit objects. These variables are −
| S.No. | Object & Description |
|---|---|
| 1 | request
This is the HttpServletRequest object associated with the request. |
| 2 | response
This is the HttpServletResponse object associated with the response to the client. |
| 3 | out
This is the PrintWriter object used to send output to the client. |
| 4 | session
This is the HttpSession object associated with the request. |
| 5 | application
This is the ServletContext object associated with the application context. |
| 6 | config
This is the ServletConfig object associated with the page. |
| 7 | pageContext
This encapsulates use of server-specific features like higher performance JspWriters. |
| 8 | page
This is simply a synonym for this, and is used to call the methods defined by the translated servlet class. |
| 9 | Exception
The Exception object allows the exception data to be accessed by designated JSP. |
We would explain JSP Implicit Objects in a separate chapter JSP – Implicit Objects.
Control-Flow Statements
You can use all the APIs and building blocks of Java in your JSP programming including decision-making statements, loops, etc.
Decision-Making Statements
The if…else block starts out like an ordinary Scriptlet, but the Scriptlet is closed at each line with HTML text included between the Scriptlet tags.
<%! int day = 3; %>
<html>
   <head><title>IF...ELSE Example</title></head>

   <body>
      <% if (day == 1 | day == 7) { %>
         <p> Today is weekend</p>
      <% } else { %>
         <p> Today is not weekend</p>
      <% } %>
   </body>
</html>
The above code will generate the following result −
Today is not weekend
Now look at the following switch…case block which has been written a bit differentlty using out.println() and inside Scriptletas −
<%! int day = 3; %>
<html>
   <head><title>SWITCH...CASE Example</title></head>

   <body>
      <%
         switch(day) {
            case 0:
               out.println("It\'s Sunday.");
               break;
            case 1:
               out.println("It\'s Monday.");
               break;
            case 2:
               out.println("It\'s Tuesday.");
               break;
            case 3:
               out.println("It\'s Wednesday.");
               break;
            case 4:
               out.println("It\'s Thursday.");
               break;
            case 5:
               out.println("It\'s Friday.");
               break;
            default:
               out.println("It's Saturday.");
         }
      %>
   </body>
</html>
The above code will generate the following result −
It’s Wednesday.
Loop Statements
You can also use three basic types of looping blocks in Java: for, while, and do…while blocks in your JSP programming. Let us look at the following for loop example −
<%! int fontSize; %>
<html>
   <head><title>FOR LOOP Example</title></head>

   <body>
      <%for ( fontSize = 1; fontSize <= 3; fontSize++){ %>
         <font color = "green" size = "<%= fontSize %>">
            JSP Tutorial
      </font><br />
      <%}%>
   </body>
</html>
The above code will generate the following result −
   JSP Tutorial


   JSP Tutorial


   JSP Tutorial
Above example can be written using the while loop as follows −
<%! int fontSize; %>
<html>
   <head><title>WHILE LOOP Example</title></head>

   <body>
      <%while ( fontSize <= 3){ %>
         <font color = "green" size = "<%= fontSize %>">
            JSP Tutorial
         </font><br />
         <%fontSize++;%>
      <%}%>
   </body>
</html>
The above code will generate the following result −
   JSP Tutorial


   JSP Tutorial


   JSP Tutorial
JSP Operators
JSP supports all the logical and arithmetic operators supported by Java. Following table lists out all the operators with the highest precedence appear at the top of the table, those with the lowest appear at the bottom.
Within an expression, higher precedence operators will be evaluated first.
| Category | Operator | Associativity |
|---|---|---|
| Postfix | () [] . (dot operator) | Left to right |
| Unary | ++ – – ! ~ | Right to left |
| Multiplicative | * / % | Left to right |
| Additive | + – | Left to right |
| Shift | >> >>> << | Left to right |
| Relational | > >= < <= | Left to right |
| Equality | == != | Left to right |
| Bitwise AND | & | Left to right |
| Bitwise XOR | ^ | Left to right |
| Bitwise OR | | | Left to right |
| Logical AND | && | Left to right |
| Logical OR | || | Left to right |
| Conditional | ?: | Right to left |
| Assignment | = += -= *= /= %= >>= <<= &= ^= |= | Right to left |
| Comma | , | Left to right |
JSP Literals
The JSP expression language defines the following literals −
- Boolean − true and false
- Integer − as in Java
- Floating point − as in Java
- String − with single and double quotes; ” is escaped as \”, ‘ is escaped as \’, and \ is escaped as \\.
- Null − null
The Methods in Form Processing
Let us now discuss the methods in Form Processing.
GET method
The GET method sends the encoded user information appended to the page request. The page and the encoded information are separated by the ? character as follows −
http://www.test.com/hello?key1=value1&key2=value2
The GET method is the default method to pass information from the browser to the web server and it produces a long string that appears in your browser’s Location:box. It is recommended that the GET method is better not used. if you have password or other sensitive information to pass to the server.
The GET method has size limitation: only 1024 characters can be in a request string.
This information is passed using QUERY_STRING header and will be accessible through QUERY_STRING environment variable which can be handled using getQueryString() and getParameter() methods of request object.
POST method
A generally more reliable method of passing information to a backend program is the POST method.
This method packages the information in exactly the same way as the GET method, but instead of sending it as a text string after a ? in the URL it sends it as a separate message. This message comes to the backend program in the form of the standard input which you can parse and use for your processing.
JSP handles this type of requests using getParameter() method to read simple parameters and getInputStream() method to read binary data stream coming from the client.
Reading Form Data using JSP
JSP handles form data parsing automatically using the following methods depending on the situation −
- getParameter() − You call request.getParameter() method to get the value of a form parameter.
- getParameterValues() − Call this method if the parameter appears more than once and returns multiple values, for example checkbox.
- getParameterNames() − Call this method if you want a complete list of all parameters in the current request.
- getInputStream() − Call this method to read binary data stream coming from the client.
GET Method Example Using URL
The following URL will pass two values to HelloForm program using the GET method.
http://localhost:8080/main.jsp?first_name=ZARA&last_name=ALI
Below is the main.jsp JSP program to handle input given by web browser. We are going to use the getParameter() method which makes it very easy to access the passed information −
<html>
   <head>
      <title>Using GET Method to Read Form Data</title>
   </head>

   <body>
      <h1>Using GET Method to Read Form Data</h1>
      <ul>
         <li><p><b>First Name:</b>
            <%= request.getParameter("first_name")%>
         </p></li>
         <li><p><b>Last  Name:</b>
            <%= request.getParameter("last_name")%>
         </p></li>
      </ul>

   </body>
</html>
Now type http://localhost:8080/main.jsp?first_name=ZARA&last_name=ALI in your browser’s Location:box. This will generate the following result −
Using GET Method to Read Form Data
|
GET Method Example Using Form
Following is an example that passes two values using the HTML FORM and the submit button. We are going to use the same JSP main.jsp to handle this input.
<html>
   <body>

      <form action = "main.jsp" method = "GET">
         First Name: <input type = "text" name = "first_name">
         <br />
         Last Name: <input type = "text" name = "last_name" />
         <input type = "submit" value = "Submit" />
      </form>

   </body>
</html>
Keep this HTML in a file Hello.htm and put it in <Tomcat-installation-directory>/webapps/ROOT directory. When you would access http://localhost:8080/Hello.htm, you will receive the following output.
First Name:
Last Name: < p>Try to enter the First Name and the Last Name and then click the submit button to see the result on your local machine where tomcat is running. Based on the input provided, it will generate similar result as mentioned in the above example.
POST Method Example Using Form
Let us do a little modification in the above JSP to handle both the GET and the POST method. Below is the main.jsp JSP program to handle the input given by web browser using the GET or the POST methods.
Infact there is no change in the above JSP because the only way of passing parameters is changed and no binary data is being passed to the JSP program. File handling related concepts will be explained in separate chapter where we need to read the binary data stream.
<html>
   <head>
      <title>Using GET and POST Method to Read Form Data</title>
   </head>

   <body>
      <center>
      <h1>Using GET Method to Read Form Data</h1>

      <ul>
         <li><p><b>First Name:</b>
            <%= request.getParameter("first_name")%>
         </p></li>
         <li><p><b>Last  Name:</b>
            <%= request.getParameter("last_name")%>
         </p></li>
      </ul>

   </body>
</html>
Following is the content of the Hello.htm file −
<html>
   <body>

      <form action = "main.jsp" method = "POST">
         First Name: <input type = "text" name = "first_name">
         <br />
         Last Name: <input type = "text" name = "last_name" />
         <input type = "submit" value = "Submit" />
      </form>

   </body>
</html>
Let us now keep main.jsp and hello.htm in <Tomcat-installationdirectory>/webapps/ROOT directory. When you access http://localhost:8080/Hello.htm, you will receive the following output.
First Name:
Last Name: Try to enter the First and the Last Name and then click the submit button to see the result on your local machine where tomcat is running.
Based on the input provided, you will receive similar results as in the above examples.
Passing Checkbox Data to JSP Program
Checkboxes are used when more than one option is required to be selected.
Following is an example HTML code, CheckBox.htm, for a form with two checkboxes.
<html>
   <body>

      <form action = "main.jsp" method = "POST" target = "_blank">
         <input type = "checkbox" name = "maths" checked = "checked" /> Maths
         <input type = "checkbox" name = "physics"  /> Physics
         <input type = "checkbox" name = "chemistry" checked = "checked" /> Chemistry
         <input type = "submit" value = "Select Subject" />
      </form>

   </body>
</html>
The above code will generate the following result −
Maths Physics Chemistry
