21 aug – 26 aug
Comment Form Example using AJAX in Java
In this example, we are creating a form to post comment. The form data is saved in the database and a list of all posted comments are shown below the comment form.
Steps to create comment form example using AJAX in Java
You need to follow following steps:
- Create table in database
- load the org.json.jar file
- Create comment form
- Create server side page to save the form data and print all posted comments
Create table in database
In this example, we are using oracle 10g database. The table structure is given below:

The id field of “usercomment” table is auto incremented.
Create comment form
In this page, we have created a form that gets input from the user. When user clicks on the Post Comment button, postComment() function is called. We have written all the ajax code inside this function.
index.html
<!DOCTYPE html>
<html>
<head>
<script>
var request;
function postComment(){
var comment=document.commentform.comment.value;
var email=document.commentform.email.value;
var url=“index.jsp?comment=”+comment+”&email=”+email;
if(window.XMLHttpRequest){
request=new XMLHttpRequest();
}
else if(window.ActiveXObject){
request=new ActiveXObject(“Microsoft.XMLHTTP”);
}
try{
request.onreadystatechange=function(){
if(request.readyState==4){
var val=request.responseText;
document.getElementById(‘mylocation’).innerHTML=val;
}
}//end of function
request.open(“GET”,url,true);
request.send();
}catch(e){alert(“Unable to connect to server”);}
}
</script>
</head>
<body>
<h1>Comment Form</h1>
<form name=“commentform”>
Enter Comment:<br/>
<textarea name=“comment” style=“width:300px;height:100px” required>
</textarea><br/>
Enter Email:<br/>
<input type=“text” name=“email” required/><br/><br/>
<input type=“button” value=“Post Comment” onclick=“postComment()”>
</form>
<span id=“mylocation”></span>
</body>
</html>
Create server side page to process the request
In this jsp page, we are writing the database code to save the comment and print all comments.
index.jsp
<!DOCTYPE html>
<html>
<head>
<style>
div.box{margin:2px;border:1px solid pink;padding:10px;background-color:#e3e3e3}
</style>
</head>
<body>
<%@ page import=“java.sql.*” %>
<%
String comment=request.getParameter(“comment”);
String email=request.getParameter(“email”);
if(comment==null||email==null||comment.trim().equals(“”)||email.trim().equals(“”)){
out.print(“<p>Please write comment</p>“);
}else{
try{
Class.forName(“oracle.jdbc.driver.OracleDriver”);
Connection con=DriverManager.getConnection(“jdbc:oracle:thin:@localhost:1521:xe”,”system”,”oracle”);
PreparedStatement ps=con.prepareStatement(“insert into usercomment(comment1,email) values(?,?)”);
ps.setString(1,comment);
ps.setString(2,email);
int i=ps.executeUpdate();
PreparedStatement ps2=con.prepareStatement(“select * from usercomment order by id desc”);
ResultSet rs=ps2.executeQuery();
out.print(“<hr/><h2>Comments:</h2>“);
while(rs.next()){
out.print(“<div class=‘box’>“);
out.print(“<p>“+rs.getString(2)+”</p>“);
out.print(“<p><strong>By: “+rs.getString(3)+”</strong></p>“);
out.print(“</div>“);
}
con.close();
}catch(Exception e){out.print(e);}
}//end of else
%>
</body>
</html>
Output:-
See the comment form.

Now write comment and email id, then click on the “Post Comment” button. A list of posted comments will be displayed below the comment form.

Search Example using AJAX in Java
In this example, we are creating a form to search employee by name using ajax in java. Here, we have written the two-tier application code, to make the application easy to understand. You can write the database code, according to your standard.
Steps to create search example using AJAX in Java
You need to follow following steps:
- Create table in database
- load the org.json.jar file
- Create input form
- Create server side page to search employee using name
Create table in database
In this example, we are using oracle 10g database. Here, we have created a table “emp911” which has following data.

Create input form
In this page, we have created a form that gets input from the user to search employee by name. When user releases the key after pressing through keyboard, searchInfo() function is called. The ajax code is written inside searchInfo() function.
index.html
<!DOCTYPE html>
<html>
<head>
<script>
var request=new XMLHttpRequest();
function searchInfo(){
var name=document.vinform.name.value;
var url=“index.jsp?val=”+name;
try{
request.onreadystatechange=function(){
if(request.readyState==4){
var val=request.responseText;
document.getElementById(‘mylocation’).innerHTML=val;
}
}//end of function
request.open(“GET”,url,true);
request.send();
}catch(e){alert(“Unable to connect to server”);}
}
</script>
</head>
<body>
<h1>Search Employee</h1>
<form name=“vinform”>
<input type=“text” name=“name” onkeyup=“searchInfo()”>
</form>
<span id=“mylocation”></span>
</body>
</html>
Create server side page to process the request
In this jsp page, we are writing the database code to search employee starting with given name.
index.jsp
<%@ page import=“java.sql.*” %>
<%
String name=request.getParameter(“val”);
if(name==null||name.trim().equals(“”)){
out.print(“<p>Please enter name!</p>“);
}else{
try{
Class.forName(“oracle.jdbc.driver.OracleDriver”);
Connection con=DriverManager.getConnection(“jdbc:oracle:thin:@localhost:1521:xe”,”system”,”oracle”);
PreparedStatement ps=con.prepareStatement(“select * from emp911 where name like ‘”+name+”%'”);
ResultSet rs=ps.executeQuery();
if(!rs.isBeforeFirst()) {
out.println(“<p>No Record Found!</p>“);
}else{
out.print(“<table border=‘1’ cellpadding=‘2’ width=‘100%’>“);
out.print(“<tr><th>Id</th><th>Name</th><th>Email</th>
<th>Address</th><th>City</th><th>State</th><th>Country</th></tr>“);
while(rs.next()){
out.print(“<tr><td>“+rs.getString(1)+”</td><td>“+rs.getString(2)+”</td><td>“+rs.getString(3)+”</td>
<td>“+rs.getString(4)+”</td><td>“+rs.getString(5)+”</td><td>“+rs.getString(6)+”</td>
<td>“+rs.getString(7)+”</td></tr>“);
}
out.print(“</table>“);
}//end of else for rs.isBeforeFirst
con.close();
}catch(Exception e){out.print(e);}
}//end of else
%>
Output:-
See the search form.

Now enter employee name. If employee name is not found, it will display “No record found!” message.

Now enter employee name that exists in the table. Now it will display all records starting with given name
.

AJAX Security
AJAX Security: Server Side
- AJAX-based Web applications use the same server-side security schemes of regular Web applications.
- You specify authentication, authorization, and data protection requirements in your web.xml file (declarative) or in your program (programmatic).
- AJAX-based Web applications are subject to the same security threats as regular Web applications.
AJAX Security: Client Side
- JavaScript code is visible to a user/hacker. Hacker can use JavaScript code for inferring server-side weaknesses.
- JavaScript code is downloaded from the server and executed (“eval”) at the client and can compromise the client by mal-intended code.
- Downloaded JavaScript code is constrained by the sand-box security model and can be relaxed for signed JavaScript.
SERVLETS
Servlet technology is used to create web application (resides at server side and generates dynamic web page).
Servlet technology is robust and scalable because of java language. Before Servlet, CGI (Common Gateway Interface) scripting language was popular as a server-side programming language. But there was many disadvantages of this technology. We have discussed these disadvantages below.
There are many interfaces and classes in the servlet API such as Servlet, GenericServlet, HttpServlet, ServletRequest, ServletResponse etc.
What is a Servlet?
Servlet can be described in many ways, depending on the context.
- Servlet is a technology i.e. used to create web application.
- Servlet is an API that provides many interfaces and classes including documentations.
- Servlet is an interface that must be implemented for creating any servlet.
- Servlet is a class that extend the capabilities of the servers and respond to the incoming request. It can respond to any type of requests.
- Servlet is a web component that is deployed on the server to create dynamic web page.
What is web application?
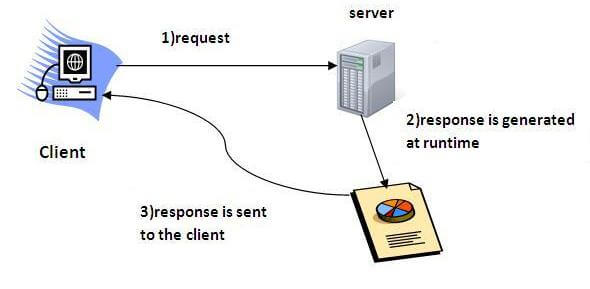
A web application is an application accessible from the web. A web application is composed of web components like Servlet, JSP, Filter etc. and other components such as HTML. The web components typically execute in Web Server and respond to HTTP request.
CGI(Commmon Gateway Interface)
CGI technology enables the web server to call an external program and pass HTTP request information to the external program to process the request. For each request, it starts a new process.
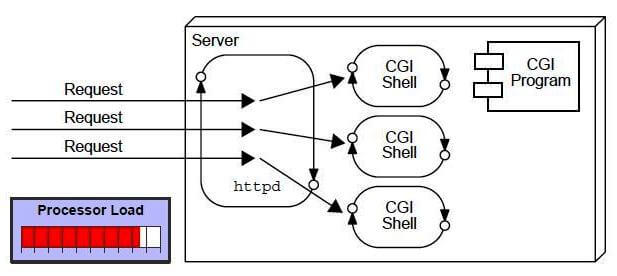
Disadvantages of CGI
There are many problems in CGI technology:
- If number of clients increases, it takes more time for sending response.
- For each request, it starts a process and Web server is limited to start processes.
- It uses platform dependent language e.g. C, C++, perl.
Advantage of Servlet
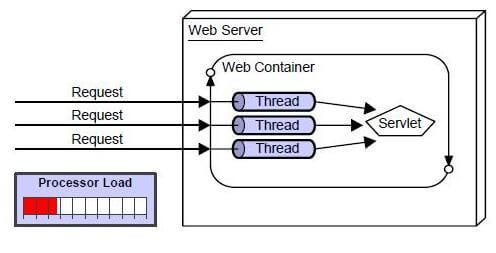
There are many advantages of servlet over CGI. The web container creates threads for handling the multiple requests to the servlet. Threads have a lot of benefits over the Processes such as they share a common memory area, lightweight, cost of communication between the threads are low. The basic benefits of servlet are as follows:
- better performance: because it creates a thread for each request not process.
- Portability: because it uses java language.
- Robust: Servlets are managed by JVM so we don’t need to worry about memory leak, garbage collection etc.
- Secure: because it uses java language.
Life Cycle
A servlet life cycle can be defined as the entire process from its creation till the destruction. The following are the paths followed by a servlet.
- The servlet is initialized by calling the init() method.
- The servlet calls service() method to process a client’s request.
- The servlet is terminated by calling the destroy() method.
- Finally, servlet is garbage collected by the garbage collector of the JVM.
Now let us discuss the life cycle methods in detail.
The init() Method
The init method is called only once. It is called only when the servlet is created, and not called for any user requests afterwards. So, it is used for one-time initializations, just as with the init method of applets.
The servlet is normally created when a user first invokes a URL corresponding to the servlet, but you can also specify that the servlet be loaded when the server is first started.
When a user invokes a servlet, a single instance of each servlet gets created, with each user request resulting in a new thread that is handed off to doGet or doPost as appropriate. The init() method simply creates or loads some data that will be used throughout the life of the servlet.
The init method definition looks like this −
public void init() throws ServletException {
   // Initialization code...
}
The service() Method
The service() method is the main method to perform the actual task. The servlet container (i.e. web server) calls the service() method to handle requests coming from the client( browsers) and to write the formatted response back to the client.
Each time the server receives a request for a servlet, the server spawns a new thread and calls service. The service() method checks the HTTP request type (GET, POST, PUT, DELETE, etc.) and calls doGet, doPost, doPut, doDelete, etc. methods as appropriate.
Here is the signature of this method −
public void service(ServletRequest request, ServletResponse response)
   throws ServletException, IOException {
}
The service () method is called by the container and service method invokes doGe, doPost, doPut, doDelete, etc. methods as appropriate. So you have nothing to do with service() method but you override either doGet() or doPost() depending on what type of request you receive from the client.
The doGet() and doPost() are most frequently used methods with in each service request. Here is the signature of these two methods.
The doGet() Method
A GET request results from a normal request for a URL or from an HTML form that has no METHOD specified and it should be handled by doGet() method.
public void doGet(HttpServletRequest request, HttpServletResponse response)
   throws ServletException, IOException {
   // Servlet code
}
The doPost() Method
A POST request results from an HTML form that specifically lists POST as the METHOD and it should be handled by doPost() method.
public void doPost(HttpServletRequest request, HttpServletResponse response)
   throws ServletException, IOException {
   // Servlet code
}
The destroy() Method
The destroy() method is called only once at the end of the life cycle of a servlet. This method gives your servlet a chance to close database connections, halt background threads, write cookie lists or hit counts to disk, and perform other such cleanup activities.
After the destroy() method is called, the servlet object is marked for garbage collection. The destroy method definition looks like this −
public void destroy() {
   // Finalization code...
}
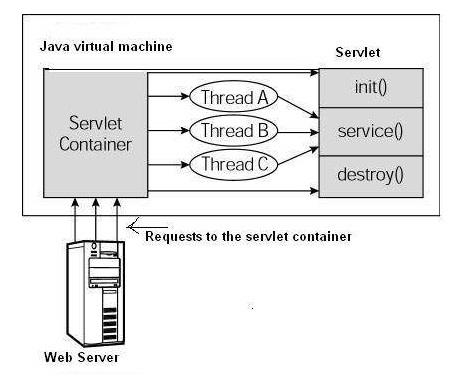
Architecture Diagram
The following figure depicts a typical servlet life-cycle scenario.
- First the HTTP requests coming to the server are delegated to the servlet container.
- The servlet container loads the servlet before invoking the service() method.
- Then the servlet container handles multiple requests by spawning multiple threads, each thread executing the service() method of a single instance of the servlet.
Servlets Example:-
Servlets are Java classes which service HTTP requests and implement the javax.servlet.Servlet interface. Web application developers typically write servlets that extend javax.servlet.http.HttpServlet, an abstract class that implements the Servlet interface and is specially designed to handle HTTP requests.
Sample Code
Following is the sample source code structure of a servlet example to show Hello World −
// Import required java libraries
import java.io.*;
import javax.servlet.*;
import javax.servlet.http.*;

// Extend HttpServlet class
public class HelloWorld extends HttpServlet {

   private String message;

   public void init() throws ServletException {
      // Do required initialization
      message = "Hello World";
   }

   public void doGet(HttpServletRequest request, HttpServletResponse response)
      throws ServletException, IOException {

      // Set response content type
      response.setContentType("text/html");

      // Actual logic goes here.
      PrintWriter out = response.getWriter();
      out.println("<h1>" + message + "</h1>");
   }

   public void destroy() {
      // do nothing.
   }
}
Compiling a Servlet
Let us create a file with name HelloWorld.java with the code shown above. Place this file at C:\ServletDevel (in Windows) or at /usr/ServletDevel (in Unix). This path location must be added to CLASSPATH before proceeding further.
Assuming your environment is setup properly, go in ServletDevel directory and compile HelloWorld.java as follows −
$ javac HelloWorld.java
If the servlet depends on any other libraries, you have to include those JAR files on your CLASSPATH as well. I have included only servlet-api.jar JAR file because I’m not using any other library in Hello World program.
This command line uses the built-in javac compiler that comes with the Sun Microsystems Java Software Development Kit (JDK). For this command to work properly, you have to include the location of the Java SDK that you are using in the PATH environment variable.
If everything goes fine, above compilation would produce HelloWorld.classfile in the same directory. Next section would explain how a compiled servlet would be deployed in production.
Servlet Deployment
By default, a servlet application is located at the path <Tomcat-installationdirectory>/webapps/ROOT and the class file would reside in <Tomcat-installationdirectory>/webapps/ROOT/WEB-INF/classes.
If you have a fully qualified class name of com.myorg.MyServlet, then this servlet class must be located in WEB-INF/classes/com/myorg/MyServlet.class.
For now, let us copy HelloWorld.class into <Tomcat-installationdirectory>/webapps/ROOT/WEB-INF/classes and create following entries in web.xml file located in <Tomcat-installation-directory>/webapps/ROOT/WEB-INF/
<servlet>
   <servlet-name>HelloWorld</servlet-name>
   <servlet-class>HelloWorld</servlet-class>
</servlet>

<servlet-mapping>
   <servlet-name>HelloWorld</servlet-name>
   <url-pattern>/HelloWorld</url-pattern>
</servlet-mapping>
Above entries to be created inside <web-app>…</web-app> tags available in web.xml file. There could be various entries in this table already available, but never mind.
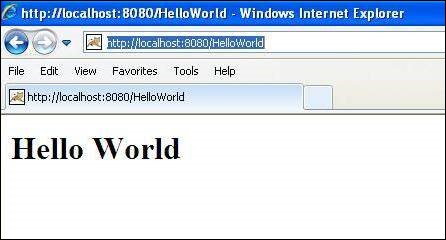
You are almost done, now let us start tomcat server using <Tomcat-installationdirectory>\bin\startup.bat (on Windows) or <Tomcat-installationdirectory>/bin/startup.sh (on Linux/Solaris etc.) and finally type http://localhost:8080/HelloWorld in the browser’s address box. If everything goes fine, you would get the following result
Form Data:-
You must have come across many situations when you need to pass some information from your browser to web server and ultimately to your backend program. The browser uses two methods to pass this information to web server. These methods are GET Method and POST Method.
GET Method
The GET method sends the encoded user information appended to the page request. The page and the encoded information are separated by the ?(question mark) symbol as follows −
http://www.test.com/hello?key1 = value1&key2 = value2
The GET method is the default method to pass information from browser to web server and it produces a long string that appears in your browser’s Location:box. Never use the GET method if you have password or other sensitive information to pass to the server. The GET method has size limitation: only 1024 characters can be used in a request string.
This information is passed using QUERY_STRING header and will be accessible through QUERY_STRING environment variable and Servlet handles this type of requests using doGet() method.
POST Method
A generally more reliable method of passing information to a backend program is the POST method. This packages the information in exactly the same way as GET method, but instead of sending it as a text string after a ? (question mark) in the URL it sends it as a separate message. This message comes to the backend program in the form of the standard input which you can parse and use for your processing. Servlet handles this type of requests using doPost() method.
Reading Form Data using Servlet
Servlets handles form data parsing automatically using the following methods depending on the situation −
- getParameter() − You call request.getParameter() method to get the value of a form parameter.
- getParameterValues() − Call this method if the parameter appears more than once and returns multiple values, for example checkbox.
- getParameterNames() − Call this method if you want a complete list of all parameters in the current request.
GET Method Example using URL
Here is a simple URL which will pass two values to HelloForm program using GET method.
http://localhost:8080/HelloForm?first_name = ZARA&last_name = ALI
Given below is the HelloForm.java servlet program to handle input given by web browser. We are going to use getParameter() method which makes it very easy to access passed information −
// Import required java libraries
import java.io.*;
import javax.servlet.*;
import javax.servlet.http.*;

// Extend HttpServlet class
public class HelloForm extends HttpServlet {

   public void doGet(HttpServletRequest request, HttpServletResponse response)
      throws ServletException, IOException {

      // Set response content type
      response.setContentType("text/html");

      PrintWriter out = response.getWriter();
      String title = "Using GET Method to Read Form Data";
      String docType =
         "<!doctype html public \"-//w3c//dtd html 4.0 " + "transitional//en\">\n";

      out.println(docType +
         "<html>\n" +
            "<head><title>" + title + "</title></head>\n" +
            "<body bgcolor = \"#f0f0f0\">\n" +
               "<h1 align = \"center\">" + title + "</h1>\n" +
               "<ul>\n" +
                  "  <li><b>First Name</b>: "
                  + request.getParameter("first_name") + "\n" +
                  "  <li><b>Last Name</b>: "
                  + request.getParameter("last_name") + "\n" +
               "</ul>\n" +
            "</body>
         </html>"
      );
   }
}
Assuming your environment is set up properly, compile HelloForm.java as follows −
$ javac HelloForm.java
If everything goes fine, above compilation would produce HelloForm.classfile. Next you would have to copy this class file in <Tomcat-installationdirectory>/webapps/ROOT/WEB-INF/classes and create following entries in web.xml file located in <Tomcat-installation-directory>/webapps/ROOT/WEB-INF/
<servlet>
   <servlet-name>HelloForm</servlet-name>
   <servlet-class>HelloForm</servlet-class>
</servlet>

<servlet-mapping>
   <servlet-name>HelloForm</servlet-name>
   <url-pattern>/HelloForm</url-pattern>
</servlet-mapping>
Now type http://localhost:8080/HelloForm?first_name=ZARA&last_name=ALIin your browser’s Location:box and make sure you already started tomcat server, before firing above command in the browser. This would generate following result −
Using GET Method to Read Form Data
- First Name: ZARA
- Last Name: ALI
GET Method Example Using Form
Here is a simple example which passes two values using HTML FORM and submit button. We are going to use same Servlet HelloForm to handle this imput.
<html>
   <body>
      <form action = "HelloForm" method = "GET">
         First Name: <input type = "text" name = "first_name">
         <br />
         Last Name: <input type = "text" name = "last_name" />
         <input type = "submit" value = "Submit" />
      </form>
   </body>
</html>
Keep this HTML in a file Hello.htm and put it in <Tomcat-installationdirectory>/webapps/ROOT directory. When you would access http://localhost:8080/Hello.htm, here is the actual output of the above form.
First Name: Last Name: Try to enter First Name and Last Name and then click submit button to see the result on your local machine where tomcat is running. Based on the input provided, it will generate similar result as mentioned in the above example.
POST Method Example Using Form
Let us do little modification in the above servlet, so that it can handle GET as well as POST methods. Below is HelloForm.java servlet program to handle input given by web browser using GET or POST methods.
// Import required java libraries
import java.io.*;
import javax.servlet.*;
import javax.servlet.http.*;

// Extend HttpServlet class
public class HelloForm extends HttpServlet {

   // Method to handle GET method request.
   public void doGet(HttpServletRequest request, HttpServletResponse response)
      throws ServletException, IOException {

      // Set response content type
      response.setContentType("text/html");

      PrintWriter out = response.getWriter();
      String title = "Using GET Method to Read Form Data";
      String docType =
         "<!doctype html public \"-//w3c//dtd html 4.0 " +
         "transitional//en\">\n";

      out.println(docType +
         "<html>\n" +
            "<head><title>" + title + "</title></head>\n" +
            "<body bgcolor = \"#f0f0f0\">\n" +
               "<h1 align = \"center\">" + title + "</h1>\n" +
               "<ul>\n" +
                  "  <li><b>First Name</b>: "
                  + request.getParameter("first_name") + "\n" +
                  "  <li><b>Last Name</b>: "
                  + request.getParameter("last_name") + "\n" +
               "</ul>\n" +
            "</body>
         </html>"
      );
   }

   // Method to handle POST method request.
   public void doPost(HttpServletRequest request, HttpServletResponse response)
      throws ServletException, IOException {

      doGet(request, response);
   }
}
Now compile and deploy the above Servlet and test it using Hello.htm with the POST method as follows −
<html>
   <body>
      <form action = "HelloForm" method = "POST">
         First Name: <input type = "text" name = "first_name">
         <br />
         Last Name: <input type = "text" name = "last_name" />
         <input type = "submit" value = "Submit" />
      </form>
   </body>
</html>
Here is the actual output of the above form, Try to enter First and Last Name and then click submit button to see the result on your local machine where tomcat is running.
First Name: Last Name: Based on the input provided, it would generate similar result as mentioned in the above examples.
Passing Checkbox Data to Servlet Program
Checkboxes are used when more than one option is required to be selected.
Here is example HTML code, CheckBox.htm, for a form with two checkboxes
<html>
   <body>
      <form action = "CheckBox" method = "POST" target = "_blank">
         <input type = "checkbox" name = "maths" checked = "checked" /> Maths
         <input type = "checkbox" name = "physics"  /> Physics
         <input type = "checkbox" name = "chemistry" checked = "checked" />
                                          Chemistry
         <input type = "submit" value = "Select Subject" />
      </form>
   </body>
</html>
The result of this code is the following form
Maths Physics Chemistry Given below is the CheckBox.java servlet program to handle input given by web browser for checkbox button.
// Import required java libraries
import java.io.*;
import javax.servlet.*;
import javax.servlet.http.*;

// Extend HttpServlet class
public class CheckBox extends HttpServlet {

   // Method to handle GET method request.
   public void doGet(HttpServletRequest request, HttpServletResponse response)
      throws ServletException, IOException {

      // Set response content type
      response.setContentType("text/html");

      PrintWriter out = response.getWriter();
      String title = "Reading Checkbox Data";
      String docType =
         "<!doctype html public \"-//w3c//dtd html 4.0 " + "transitional//en\">\n";

      out.println(docType +
         "<html>\n" +
            "<head><title>" + title + "</title></head>\n" +
            "<body bgcolor = \"#f0f0f0\">\n" +
               "<h1 align = \"center\">" + title + "</h1>\n" +
               "<ul>\n" +
                  "  <li><b>Maths Flag : </b>: "
                  + request.getParameter("maths") + "\n" +
                  "  <li><b>Physics Flag: </b>: "
                  + request.getParameter("physics") + "\n" +
                  "  <li><b>Chemistry Flag: </b>: "
                  + request.getParameter("chemistry") + "\n" +
               "</ul>\n" +
            "</body>
         </html>"
      );
   }

   // Method to handle POST method request.
   public void doPost(HttpServletRequest request, HttpServletResponse response)
      throws ServletException, IOException {

      doGet(request, response);
   }
}
For the above example, it would display following result −
Reading Checkbox Data
- Maths Flag : : on
- Physics Flag: : null
- Chemistry Flag: : on
Reading All Form Parameters
Following is the generic example which uses getParameterNames() method of HttpServletRequest to read all the available form parameters. This method returns an Enumeration that contains the parameter names in an unspecified order Once we have an Enumeration, we can loop down the Enumeration in standard way by, using hasMoreElements() method to determine when to stop and using nextElement() method to get each parameter name.
// Import required java libraries
import java.io.*;
import javax.servlet.*;
import javax.servlet.http.*;
import java.util.*;

// Extend HttpServlet class
public class ReadParams extends HttpServlet {

   // Method to handle GET method request.
   public void doGet(HttpServletRequest request, HttpServletResponse response)
      throws ServletException, IOException {

      // Set response content type
      response.setContentType("text/html");

      PrintWriter out = response.getWriter();
      String title = "Reading All Form Parameters";
      String docType =
         "<!doctype html public \"-//w3c//dtd html 4.0 " + "transitional//en\">\n";

      out.println(docType +
         "<html>\n" +
         "<head><title>" + title + "</title></head>\n" +
         "<body bgcolor = \"#f0f0f0\">\n" +
         "<h1 align = \"center\">" + title + "</h1>\n" +
         "<table width = \"100%\" border = \"1\" align = \"center\">\n" +
         "<tr bgcolor = \"#949494\">\n" +
            "<th>Param Name</th>
            <th>Param Value(s)</th>\n"+
         "</tr>\n"
      );

      Enumeration paramNames = request.getParameterNames();

      while(paramNames.hasMoreElements()) {
         String paramName = (String)paramNames.nextElement();
         out.print("<tr><td>" + paramName + "</td>\n<td>");
         String[] paramValues = request.getParameterValues(paramName);

         // Read single valued data
         if (paramValues.length == 1) {
            String paramValue = paramValues[0];
            if (paramValue.length() == 0)
               out.println("<i>No Value</i>");
               else
               out.println(paramValue);
         } else {
            // Read multiple valued data
            out.println("<ul>");

            for(int i = 0; i < paramValues.length; i++) {
               out.println("<li>" + paramValues[i]);
            }
            out.println("</ul>");
         }
      }
      out.println("</tr>\n</table>\n</body></html>");
   }

   // Method to handle POST method request.
   public void doPost(HttpServletRequest request, HttpServletResponse response)
      throws ServletException, IOException {

      doGet(request, response);
   }
}
Now, try the above servlet with the following form −
<html>
   <body>
      <form action = "ReadParams" method = "POST" target = "_blank">
         <input type = "checkbox" name = "maths" checked = "checked" /> Maths
         <input type = "checkbox" name = "physics"  /> Physics
         <input type = "checkbox" name = "chemistry" checked = "checked" /> Chem
         <input type = "submit" value = "Select Subject" />
      </form>
   </body>
</html>
Now calling servlet using the above form would generate the following result −
Reading All Form Parameters
| Param Name | Param Value(s) |
|---|---|
| maths | on |
| chemistry | on |
Writing Filters
Servlet Filters are Java classes that can be used in Servlet Programming for the following purposes −
- To intercept requests from a client before they access a resource at back end.
- To manipulate responses from server before they are sent back to the client.
There are various types of filters suggested by the specifications −
- Authentication Filters.
- Data compression Filters.
- Encryption Filters.
- Filters that trigger resource access events.
- Image Conversion Filters.
- Logging and Auditing Filters.
- MIME-TYPE Chain Filters.
- Tokenizing Filters .
- XSL/T Filters That Transform XML Content.
Filters are deployed in the deployment descriptor file web.xml and then map to either servlet names or URL patterns in your application’s deployment descriptor.
When the web container starts up your web application, it creates an instance of each filter that you have declared in the deployment descriptor. The filters execute in the order that they are declared in the deployment descriptor.
Servlet Filter Methods
A filter is simply a Java class that implements the javax.servlet.Filter interface. The javax.servlet.Filter interface defines three methods −
| Sr.No. | Method & Description |
|---|---|
| 1 | public void doFilter (ServletRequest, ServletResponse, FilterChain)
This method is called by the container each time a request/response pair is passed through the chain due to a client request for a resource at the end of the chain. |
| 2 | public void init(FilterConfig filterConfig)
This method is called by the web container to indicate to a filter that it is being placed into service. |
| 3 | public void destroy()
This method is called by the web container to indicate to a filter that it is being taken out of service. |
Servlet Filter − Example
Following is the Servlet Filter Example that would print the clients IP address and current date time. This example would give you basic understanding of Servlet Filter, but you can write more sophisticated filter applications using the same concept −
// Import required java libraries
import java.io.*;
import javax.servlet.*;
import javax.servlet.http.*;
import java.util.*;

// Implements Filter class
public class LogFilter implements Filter  {
   public void  init(FilterConfig config) throws ServletException {

      // Get init parameter
      String testParam = config.getInitParameter("test-param");

      //Print the init parameter
      System.out.println("Test Param: " + testParam);
   }

   public void  doFilter(ServletRequest request, ServletResponse response,
      FilterChain chain) throws java.io.IOException, ServletException {

      // Get the IP address of client machine.
      String ipAddress = request.getRemoteAddr();

      // Log the IP address and current timestamp.
      System.out.println("IP "+ ipAddress + ", Time " + new Date().toString());

      // Pass request back down the filter chain
      chain.doFilter(request,response);
   }

   public void destroy( ) {
      /* Called before the Filter instance is removed from service by the web container*/
   }
}
Compile LogFilter.java in usual way and put your class file in <Tomcat-installationdirectory>/webapps/ROOT/WEB-INF/classes
Servlet Filter Mapping in Web.xml
Filters are defined and then mapped to a URL or Servlet, in much the same way as Servlet is defined and then mapped to a URL pattern. Create the following entry for filter tag in the deployment descriptor file web.xml
<filter>
   <filter-name>LogFilter</filter-name>
   <filter-class>LogFilter</filter-class>
   <init-param>
      <param-name>test-param</param-name>
      <param-value>Initialization Paramter</param-value>
   </init-param>
</filter>

<filter-mapping>
   <filter-name>LogFilter</filter-name>
   <url-pattern>/*</url-pattern>
</filter-mapping>
The above filter would apply to all the servlets because we specified /* in our configuration. You can specicy a particular servlet path if you want to apply filter on few servlets only.
Now try to call any servlet in usual way and you would see generated log in your web server log. You can use Log4J logger to log above log in a separate file.
Using Multiple Filters
Your web application may define several different filters with a specific purpose. Consider, you define two filters AuthenFilter and LogFilter. Rest of the process would remain as explained above except you need to create a different mapping as mentioned below −
<filter>
   <filter-name>LogFilter</filter-name>
   <filter-class>LogFilter</filter-class>
   <init-param>
      <param-name>test-param</param-name>
      <param-value>Initialization Paramter</param-value>
   </init-param>
</filter>

<filter>
   <filter-name>AuthenFilter</filter-name>
   <filter-class>AuthenFilter</filter-class>
   <init-param>
      <param-name>test-param</param-name>
      <param-value>Initialization Paramter</param-value>
   </init-param>
</filter>

<filter-mapping>
   <filter-name>LogFilter</filter-name>
   <url-pattern>/*</url-pattern>
</filter-mapping>

<filter-mapping>
   <filter-name>AuthenFilter</filter-name>
   <url-pattern>/*</url-pattern>
</filter-mapping>
Filters Application Order
The order of filter-mapping elements in web.xml determines the order in which the web container applies the filter to the servlet. To reverse the order of the filter, you just need to reverse the filter-mapping elements in the web.xml file.
For example, above example would apply LogFilter first and then it would apply AuthenFilter to any servlet but the following example would reverse the order −
<filter-mapping>
   <filter-name>AuthenFilter</filter-name>
   <url-pattern>/*</url-pattern>
</filter-mapping>

<filter-mapping>
   <filter-name>LogFilter</filter-name>
   <url-pattern>/*</url-pattern>
</filter-mapping>
