13 nov- 22 nov

This spring tutorial provides in-depth concepts of Spring Framework with simplified examples. It was developed by Rod Johnson in 2003. Spring framework makes the easy development of JavaEE application.
It is helpful for beginners and experienced persons.
Spring Framework
Spring is a lightweight framework. It can be thought of as a framework of frameworks because it provides support to various frameworks such as Struts, Hibernate, Tapestry, EJB, JSF etc. The framework, in broader sense, can be defined as a structure where we find solution of the various technical problems.
The Spring framework comprises several modules such as IOC, AOP, DAO, Context, ORM, WEB MVC etc. We will learn these modules in next page. Let’s understand the IOC and Dependency Injection first.
Advantages of Spring Framework
There are many advantages of Spring Framework. They are as follows:
1) Predefined Templates
Spring framework provides templates for JDBC, Hibernate, JPA etc. technologies. So there is no need to write too much code. It hides the basic steps of these technologies.
Let’s take the example of JdbcTemplate, you don’t need to write the code for exception handling, creating connection, creating statement, committing transaction, closing connection etc. You need to write the code of executing query only. Thus, it save a lot of JDBC code.
2) Loose Coupling
The Spring applications are loosely coupled because of dependency injection.
3) Easy to test
The Dependency Injection makes easier to test the application. The EJB or Struts application require server to run the application but Spring framework doesn’t require server.
4) Lightweight
Spring framework is lightweight because of its POJO implementation. The Spring Framework doesn’t force the programmer to inherit any class or implement any interface. That is why it is said non-invasive.
5) Fast Development
The Dependency Injection feature of Spring Framework and it support to various frameworks makes the easy development of JavaEE application.
6) Powerful abstraction
It provides powerful abstraction to JavaEE specifications such as JMS, JDBC, JPA and JTA.
7) Declarative support
It provides declarative support for caching, validation, transactions and formatting.
Spring mvc
Spring MVC tutorial provides an elegant solution to use MVC in spring framework by the help of DispatcherServlet.
In Spring Web MVC, DispatcherServlet class works as the front controller. It is responsible to manage the flow of the spring mvc application.
The @Controller annotation is used to mark the class as the controller in Spring 3.
The @RequestMapping annotation is used to map the request url. It is applied on the method.
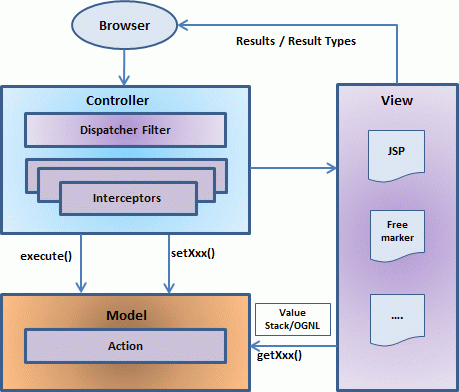
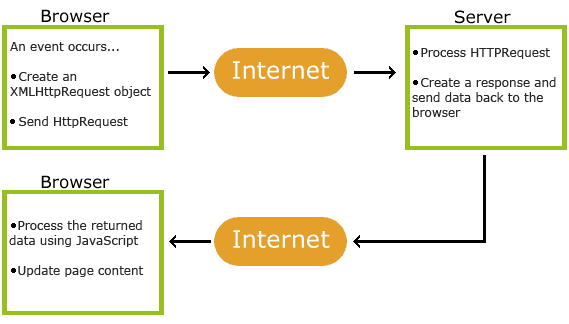
nderstanding the flow of Spring Web MVC
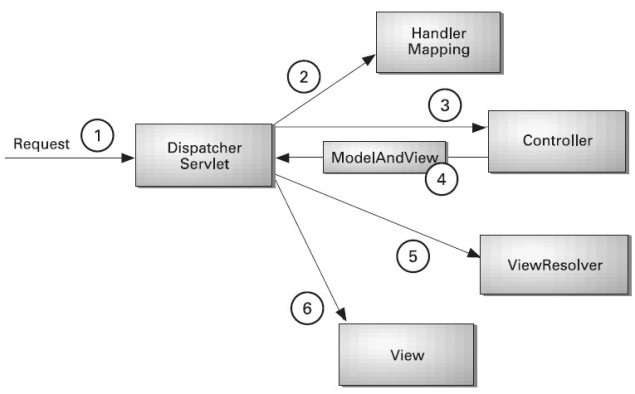
As displayed in the figure, all the incoming request is intercepted by the DispatcherServlet that works as the front controller. The DispatcherServlet gets entry of handler mapping from the xml file and forwards the request to the controller. The controller returns an object of ModelAndView. The DispatcherServlet checks the entry of view resolver in the xml file and invokes the specified view component.
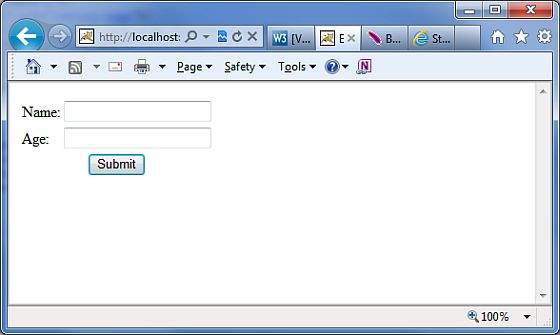
Spring MVC Form Example
Here, we will learn how to handle a form data in spring MVC without using database. Here, we will use @Controler, @RequestMapping and @ModelAttribute annotations.
To display the input form, we are going to use <form:form> tag of spring framework. Let’s see a simple example to store form data in a model object and display data of a list.
Required Jar files
To run this example, you need to load:
- Spring Core jar files
- Spring Web jar files
index.jsp
- <a href=“empform”>Add Employee</a>
- <a href=“viewemp”>View Employees</a>
Emp.java
package com.javatpoint.beans;
public class Emp {
private int id;
private String name;
private float salary;
private String designation;
public Emp() {}
public Emp(int id, String name, float salary, String designation) {
super();
this.id = id;
this.name = name;
this.salary = salary;
this.designation = designation;
}
public int getId() {
return id;
}
public void setId(int id) {
this.id = id;
}
public String getName() {
return name;
}
public void setName(String name) {
this.name = name;
}
public float getSalary() {
return salary;
}
public void setSalary(float salary) {
this.salary = salary;
}
public String getDesignation() {
return designation;
}
public void setDesignation(String designation) {
this.designation = designation;
}
}
er.java
package com.javatpoint.controllers;
import java.util.ArrayList;
import java.util.List;
import org.springframework.stereotype.Controller;
import org.springframework.web.bind.annotation.ModelAttribute;
import org.springframework.web.bind.annotation.RequestMapping;
import org.springframework.web.bind.annotation.RequestMethod;
import org.springframework.web.servlet.ModelAndView;
import com.javatpoint.beans.Emp;
@Controller
public class EmpController {
@RequestMapping(“/empform”)
public ModelAndView showform(){
//command is a reserved request attribute name, now use <form> tag to show object data
return new ModelAndView(“empform”,“command”,new Emp());
}
@RequestMapping(value=“/save”,method = RequestMethod.POST)
public ModelAndView save(@ModelAttribute(“emp”) Emp emp){
//write code to save emp object
//here, we are displaying emp object to prove emp has data
System.out.println(emp.getName()+” “+emp.getSalary()+” “+emp.getDesignation());
//return new ModelAndView(“empform”,”command”,emp);//will display object data
return new ModelAndView(“redirect:/viewemp”);//will redirect to viewemp request mapping
}
@RequestMapping(“/viewemp”)
public ModelAndView viewemp(){
//write the code to get all employees from DAO
//here, we are writing manual code of list for easy understanding
List<Emp> list=new ArrayList<Emp>();
list.add(new Emp(1,“rahul”,35000f,“S.Engineer”));
list.add(new Emp(2,“aditya”,25000f,“IT Manager”));
list.add(new Emp(3,“sachin”,55000f,“Care Taker”));
return new ModelAndView(“viewemp”,“list”,list);
}
}
web.xml
<?xml version=“1.0” encoding=“UTF-8”?>
<web-app version=“2.5”
xmlns=“http://java.sun.com/xml/ns/javaee”
xmlns:xsi=“http://www.w3.org/2001/XMLSchema-instance”
xsi:schemaLocation=”http://java.sun.com/xml/ns/javaee
http://java.sun.com/xml/ns/javaee/web-app_2_5.xsd”>
<servlet>
<servlet-name>spring</servlet-name>
<servlet-class>org.springframework.web.servlet.DispatcherServlet</servlet-class>
<load-on-startup>1</load-on-startup>
</servlet>
<servlet-mapping>
<servlet-name>spring</servlet-name>
<url-pattern>/</url-pattern>
</servlet-mapping>
</web-app>
spring-servlet.xml
<?xml version=“1.0” encoding=“UTF-8”?>
<beans xmlns=“http://www.springframework.org/schema/beans”
xmlns:xsi=“http://www.w3.org/2001/XMLSchema-instance”
xmlns:p=“http://www.springframework.org/schema/p”
xmlns:context=“http://www.springframework.org/schema/context”
xsi:schemaLocation=”http://www.springframework.org/schema/beans
http://www.springframework.org/schema/beans/spring-beans-3.0.xsd
http://www.springframework.org/schema/context
http://www.springframework.org/schema/context/spring-context-3.0.xsd”>
<context:component-scan base-package=“com.javatpoint.controllers”></context:component-scan>
<bean class=“org.springframework.web.servlet.view.InternalResourceViewResolver”>
<property name=“prefix” value=“/WEB-INF/jsp/”></property>
<property name=“suffix” value=“.jsp”></property>
</bean>
</beans>
empform.jsp
<%@ taglib uri=“http://www.springframework.org/tags/form” prefix=“form”%>
<%@ taglib uri=“http://java.sun.com/jsp/jstl/core” prefix=“c”%>
<form:form method=“post” action=“save”>
<table >
<tr>
<td>Name : </td>
<td><form:input path=“name” /></td>
</tr>
<tr>
<td>Salary :</td>
<td><form:input path=“salary” /></td>
</tr>
<tr>
<td>Designation :</td>
<td><form:input path=“designation” /></td>
</tr>
<tr>
<td colspan=“2”><input type=“submit” value=“Save” /></td>
</tr>
</table>
</form:form>
viewemp.jsp
<%@ taglib uri=“http://www.springframework.org/tags/form” prefix=“form”%>
<%@ taglib uri=“http://java.sun.com/jsp/jstl/core” prefix=“c”%>
<table border=“2” width=“70%” cellpadding=“2”>
<tr><th>Id</th><th>Name</th><th>Salary</th><th>Designation</th></tr>
<c:forEach var=“emp” items=“${list}”>
<tr>
<td>${emp.id}</td>
<td>${emp.name}</td>
<td>${emp.salary}</td>
<td>${emp.designation}</td>
</tr>
</c:forEach>
</table>
Output


Spring MVC CRUD Example
CRUD (Create, Read, Update and Delete) application is the most important application for creating any project. It provides an idea to develop a large project. In spring MVC, we can develop a simple CRUD application.
Here, we are using JdbcTemplate for database interaction.
Required Jar files
To run this example, you need to load:
- Spring Core jar files
- Spring Web jar files
- ojdbc14.jar file for oracle
download all the jar files for spring including core, web, aop, mvc, j2ee, remoting, oxm, jdbc, orm etc.
Create table
Here, we are using emp99 table of oracle 10g database which has 4 fields: id, name, salary and designation. Here, id is auto incremented which is generated by sequence.

Spring MVC CRUD Example
index.jsp
<a href=“empform”>Add Employee</a>
<a href=“viewemp”>View Employees</a>
Emp.java
package com.javatpoint.beans;
public class Emp {
private int id;
private String name;
private float salary;
private String designation;
public int getId() {
return id;
}
public void setId(int id) {
this.id = id;
}
public String getName() {
return name;
}
public void setName(String name) {
this.name = name;
}
public float getSalary() {
return salary;
}
public void setSalary(float salary) {
this.salary = salary;
}
public String getDesignation() {
return designation;
}
public void setDesignation(String designation) {
this.designation = designation;
}
}
EmpDao.java
package com.javatpoint.dao;
import java.sql.ResultSet;
import java.sql.SQLException;
import java.util.List;
import org.springframework.jdbc.core.BeanPropertyRowMapper;
import org.springframework.jdbc.core.JdbcTemplate;
import org.springframework.jdbc.core.RowMapper;
import com.javatpoint.beans.Emp;
public class EmpDao {
JdbcTemplate template;
public void setTemplate(JdbcTemplate template) {
this.template = template;
}
public int save(Emp p){
String sql=”insert into Emp99(name,salary,designation)
values(‘”+p.getName()+”‘,“+p.getSalary()+”,‘”+p.getDesignation()+”‘)”;
return template.update(sql);
}
public int update(Emp p){
String sql=“update Emp99 set name='”+p.getName()+“‘, salary=”+p.getSalary()+”,
designation=‘”+p.getDesignation()+”‘ where id=“+p.getId()+”“;
return template.update(sql);
}
public int delete(int id){
String sql=“delete from Emp99 where id=”+id+“”;
return template.update(sql);
}
public Emp getEmpById(int id){
String sql=“select * from Emp99 where id=?”;
return template.queryForObject(sql, new Object[]{id},new BeanPropertyRowMapper<Emp>(Emp.class));
}
public List<Emp> getEmployees(){
return template.query(“select * from Emp99”,new RowMapper<Emp>(){
public Emp mapRow(ResultSet rs, int row) throws SQLException {
Emp e=new Emp();
e.setId(rs.getInt(1));
e.setName(rs.getString(2));
e.setSalary(rs.getFloat(3));
e.setDesignation(rs.getString(4));
return e;
}
});
}
- }
EmpController.java
package com.javatpoint.controllers;
import java.util.ArrayList;
import java.util.List;
import org.springframework.beans.factory.annotation.Autowired;
import org.springframework.stereotype.Controller;
import org.springframework.web.bind.annotation.ModelAttribute;
import org.springframework.web.bind.annotation.PathVariable;
import org.springframework.web.bind.annotation.RequestMapping;
import org.springframework.web.bind.annotation.RequestMethod;
import org.springframework.web.servlet.ModelAndView;
import com.javatpoint.beans.Emp;
import com.javatpoint.dao.EmpDao;
@Controller
public class EmpController {
@Autowired
EmpDao dao;//will inject dao from xml file
/*It displays a form to input data, here “command” is a reserved request attribute
*which is used to display object data into form
*/
@RequestMapping(“/empform”)
public ModelAndView showform(){
return new ModelAndView(“empform”,“command”,new Emp());
}
/*It saves object into database. The @ModelAttribute puts request data
* into model object. You need to mention RequestMethod.POST method
* because default request is GET*/
@RequestMapping(value=“/save”,method = RequestMethod.POST)
public ModelAndView save(@ModelAttribute(“emp”) Emp emp){
dao.save(emp);
return new ModelAndView(“redirect:/viewemp”);//will redirect to viewemp request mapping
}
/* It provides list of employees in model object */
@RequestMapping(“/viewemp”)
public ModelAndView viewemp(){
List<Emp> list=dao.getEmployees();
return new ModelAndView(“viewemp”,“list”,list);
}
/* It displays object data into form for the given id.
* The @PathVariable puts URL data into variable.*/
@RequestMapping(value=“/editemp/{id}”)
public ModelAndView edit(@PathVariable int id){
Emp emp=dao.getEmpById(id);
return new ModelAndView(“empeditform”,“command”,emp);
}
/* It updates model object. */
@RequestMapping(value=“/editsave”,method = RequestMethod.POST)
public ModelAndView editsave(@ModelAttribute(“emp”) Emp emp){
dao.update(emp);
return new ModelAndView(“redirect:/viewemp”);
}
/* It deletes record for the given id in URL and redirects to /viewemp */
@RequestMapping(value=“/deleteemp/{id}”,method = RequestMethod.GET)
public ModelAndView delete(@PathVariable int id){
dao.delete(id);
return new ModelAndView(“redirect:/viewemp”);
}
}
web.xml
<?xml version=“1.0” encoding=“UTF-8”?>
<web-app version=“2.5”
xmlns=“http://java.sun.com/xml/ns/javaee”
xmlns:xsi=“http://www.w3.org/2001/XMLSchema-instance”
xsi:schemaLocation=”http://java.sun.com/xml/ns/javaee
http://java.sun.com/xml/ns/javaee/web-app_2_5.xsd”>
<servlet>
<servlet-name>spring</servlet-name>
<servlet-class>org.springframework.web.servlet.DispatcherServlet</servlet-class>
<load-on-startup>1</load-on-startup>
</servlet>
<servlet-mapping>
<servlet-name>spring</servlet-name>
<url-pattern>/</url-pattern>
</servlet-mapping>
</web-app>
spring-servlet.xml
<?xml version=“1.0” encoding=“UTF-8”?>
<beans xmlns=“http://www.springframework.org/schema/beans”
xmlns:xsi=“http://www.w3.org/2001/XMLSchema-instance”
xmlns:p=“http://www.springframework.org/schema/p”
xmlns:context=“http://www.springframework.org/schema/context”
xsi:schemaLocation=”http://www.springframework.org/schema/beans
http://www.springframework.org/schema/beans/spring-beans-3.0.xsd
http://www.springframework.org/schema/context
http://www.springframework.org/schema/context/spring-context-3.0.xsd”>
<context:component-scan base-package=“com.javatpoint.controllers”></context:component-scan>
<bean class=“org.springframework.web.servlet.view.InternalResourceViewResolver”>
<property name=“prefix” value=“/WEB-INF/jsp/”></property>
<property name=“suffix” value=“.jsp”></property>
</bean>
<bean id=“ds” class=“org.springframework.jdbc.datasource.DriverManagerDataSource”>
<property name=“driverClassName” value=“oracle.jdbc.driver.OracleDriver”></property>
<property name=“url” value=“jdbc:oracle:thin:@localhost:1521:xe”></property>
<property name=“username” value=“system”></property>
<property name=“password” value=“oracle”></property>
</bean>
<bean id=“jt” class=“org.springframework.jdbc.core.JdbcTemplate”>
<property name=“dataSource” ref=“ds”></property>
</bean>
<bean id=“dao” class=“com.javatpoint.dao.EmpDao”>
<property name=“template” ref=“jt”></property>
</bean>
</beans>
empform.jsp
<%@ taglib uri=“http://www.springframework.org/tags/form” prefix=“form”%>
<%@ taglib uri=“http://java.sun.com/jsp/jstl/core” prefix=“c”%>
<h1>Add New Employee</h1>
<form:form method=“post” action=“save”>
<table >
<tr>
<td>Name : </td>
<td><form:input path=“name” /></td>
</tr>
<tr>
<td>Salary :</td>
<td><form:input path=“salary” /></td>
</tr>
<tr>
<td>Designation :</td>
<td><form:input path=“designation” /></td>
</tr>
<tr>
<td> </td>
<td><input type=“submit” value=“Save” /></td>
</tr>
</table>
</form:form>
empeditform.jsp
Here “/SpringMVCCRUDSimple” is the project name, change this if you have different project name. For live application, you can provide full URL.
<%@ taglib uri=“http://www.springframework.org/tags/form” prefix=“form”%>
<%@ taglib uri=“http://java.sun.com/jsp/jstl/core” prefix=“c”%>
<h1>Edit Employee</h1>
<form:form method=“POST” action=“/SpringMVCCRUDSimple/editsave”>
<table >
<tr>
<td></td>
<td><form:hidden path=“id” /></td>
</tr>
<tr>
<td>Name : </td>
<td><form:input path=“name” /></td>
</tr>
<tr>
<td>Salary :</td>
<td><form:input path=“salary” /></td>
</tr>
<tr>
<td>Designation :</td>
<td><form:input path=“designation” /></td>
</tr>
<tr>
<td> </td>
<td><input type=“submit” value=“Edit Save” /></td>
</tr>
</table>
</form:form>
viewemp.jsp
<%@ taglib uri=“http://www.springframework.org/tags/form” prefix=“form”%>
<%@ taglib uri=“http://java.sun.com/jsp/jstl/core” prefix=“c”%>
<h1>Employees List</h1>
<table border=“2” width=“70%” cellpadding=“2”>
<tr><th>Id</th><th>Name</th><th>Salary</th><th>Designation</th><th>Edit</th><th>Delete</th></tr>
<c:forEach var=“emp” items=“${list}”>
<tr>
<td>${emp.id}</td>
<td>${emp.name}</td>
<td>${emp.salary}</td>
<td>${emp.designation}</td>
<td><a href=“editemp/${emp.id}”>Edit</a></td>
<td><a href=“deleteemp/${emp.id}”>Delete</a></td>
</tr>
</c:forEach>
</table>
<br/>
<a href=“empform”>Add New Employee</a>
Output

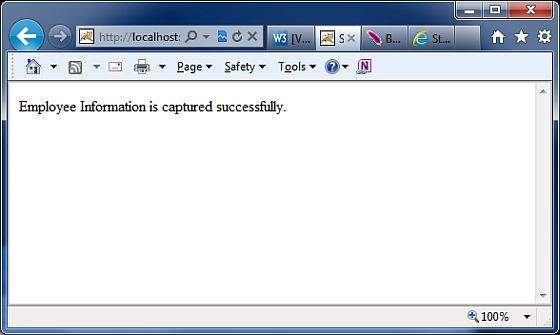
Click on “Add New Employee” link, you will see following form.

Fill data and click on save button. You will see employees list.

Now click on “edit” link, a form will appear with the data.

Now change the data of the form and click on “edit save” button.

Now click on “delete” link, you will see employees list with deleted record.

Spring MVC CRUD Example
index.jsp
<a href=“empform”>Add Employee</a>
<a href=“viewemp”>View Employees</a>
Emp.java
package com.javatpoint.beans;
public class Emp {
private int id;
private String name;
private float salary;
private String designation;
public int getId() {
return id;
}
public void setId(int id) {
this.id = id;
}
public String getName() {
return name;
}
public void setName(String name) {
this.name = name;
}
public float getSalary() {
return salary;
}
public void setSalary(float salary) {
this.salary = salary;
}
public String getDesignation() {
return designation;
}
public void setDesignation(String designation) {
this.designation = designation;
}
}
EmpDao.java
package com.javatpoint.dao;
import java.sql.ResultSet;
import java.sql.SQLException;
import java.util.List;
import org.springframework.jdbc.core.BeanPropertyRowMapper;
import org.springframework.jdbc.core.JdbcTemplate;
import org.springframework.jdbc.core.RowMapper;
import com.javatpoint.beans.Emp;
public class EmpDao {
JdbcTemplate template;
public void setTemplate(JdbcTemplate template) {
this.template = template;
}
public int save(Emp p){
String sql=”insert into Emp99(name,salary,designation)
values(‘”+p.getName()+”‘,“+p.getSalary()+”,‘”+p.getDesignation()+”‘)”;
return template.update(sql);
}
public int update(Emp p){
String sql=“update Emp99 set name='”+p.getName()+“‘, salary=”+p.getSalary()+”,
designation=‘”+p.getDesignation()+”‘ where id=“+p.getId()+”“;
return template.update(sql);
}
public int delete(int id){
String sql=“delete from Emp99 where id=”+id+“”;
return template.update(sql);
}
public Emp getEmpById(int id){
String sql=“select * from Emp99 where id=?”;
return template.queryForObject(sql, new Object[]{id},new BeanPropertyRowMapper<Emp>(Emp.class));
}
public List<Emp> getEmployees(){
return template.query(“select * from Emp99”,new RowMapper<Emp>(){
public Emp mapRow(ResultSet rs, int row) throws SQLException {
Emp e=new Emp();
e.setId(rs.getInt(1));
e.setName(rs.getString(2));
e.setSalary(rs.getFloat(3));
e.setDesignation(rs.getString(4));
return e;
}
});
}
}
EmpController.java
package com.javatpoint.controllers;
import java.util.ArrayList;
import java.util.List;
import org.springframework.beans.factory.annotation.Autowired;
import org.springframework.stereotype.Controller;
import org.springframework.web.bind.annotation.ModelAttribute;
import org.springframework.web.bind.annotation.PathVariable;
import org.springframework.web.bind.annotation.RequestMapping;
import org.springframework.web.bind.annotation.RequestMethod;
import org.springframework.web.servlet.ModelAndView;
import com.javatpoint.beans.Emp;
import com.javatpoint.dao.EmpDao;
@Controller
public class EmpController {
@Autowired
EmpDao dao;//will inject dao from xml file
/*It displays a form to input data, here “command” is a reserved request attribute
*which is used to display object data into form
*/
@RequestMapping(“/empform”)
public ModelAndView showform(){
return new ModelAndView(“empform”,“command”,new Emp());
}
/*It saves object into database. The @ModelAttribute puts request data
* into model object. You need to mention RequestMethod.POST method
* because default request is GET*/
@RequestMapping(value=“/save”,method = RequestMethod.POST)
public ModelAndView save(@ModelAttribute(“emp”) Emp emp){
dao.save(emp);
return new ModelAndView(“redirect:/viewemp”);//will redirect to viewemp request mapping
}
/* It provides list of employees in model object */
@RequestMapping(“/viewemp”)
public ModelAndView viewemp(){
List<Emp> list=dao.getEmployees();
return new ModelAndView(“viewemp”,“list”,list);
}
/* It displays object data into form for the given id.
* The @PathVariable puts URL data into variable.*/
@RequestMapping(value=“/editemp/{id}”)
public ModelAndView edit(@PathVariable int id){
Emp emp=dao.getEmpById(id);
return new ModelAndView(“empeditform”,“command”,emp);
}
/* It updates model object. */
@RequestMapping(value=“/editsave”,method = RequestMethod.POST)
public ModelAndView editsave(@ModelAttribute(“emp”) Emp emp){
dao.update(emp);
return new ModelAndView(“redirect:/viewemp”);
}
/* It deletes record for the given id in URL and redirects to /viewemp */
@RequestMapping(value=“/deleteemp/{id}”,method = RequestMethod.GET)
public ModelAndView delete(@PathVariable int id){
dao.delete(id);
return new ModelAndView(“redirect:/viewemp”);
}
}
web.xml
<?xml version=“1.0” encoding=“UTF-8”?>
<web-app version=“2.5”
xmlns=“http://java.sun.com/xml/ns/javaee”
xmlns:xsi=“http://www.w3.org/2001/XMLSchema-instance”
xsi:schemaLocation=”http://java.sun.com/xml/ns/javaee
http://java.sun.com/xml/ns/javaee/web-app_2_5.xsd”>
<servlet>
<servlet-name>spring</servlet-name>
<servlet-class>org.springframework.web.servlet.DispatcherServlet</servlet-class>
<load-on-startup>1</load-on-startup>
</servlet>
<servlet-mapping>
<servlet-name>spring</servlet-name>
<url-pattern>/</url-pattern>
</servlet-mapping>
</web-app>
spring-servlet.xml
<?xml version=“1.0” encoding=“UTF-8”?>
<beans xmlns=“http://www.springframework.org/schema/beans”
xmlns:xsi=“http://www.w3.org/2001/XMLSchema-instance”
xmlns:p=“http://www.springframework.org/schema/p”
xmlns:context=“http://www.springframework.org/schema/context”
xsi:schemaLocation=”http://www.springframework.org/schema/beans
http://www.springframework.org/schema/beans/spring-beans-3.0.xsd
http://www.springframework.org/schema/context
http://www.springframework.org/schema/context/spring-context-3.0.xsd”>
<context:component-scan base-package=“com.javatpoint.controllers”></context:component-scan>
<bean class=“org.springframework.web.servlet.view.InternalResourceViewResolver”>
<property name=“prefix” value=“/WEB-INF/jsp/”></property>
<property name=“suffix” value=“.jsp”></property>
</bean>
<bean id=“ds” class=“org.springframework.jdbc.datasource.DriverManagerDataSource”>
<property name=“driverClassName” value=“oracle.jdbc.driver.OracleDriver”></property>
<property name=“url” value=“jdbc:oracle:thin:@localhost:1521:xe”></property>
<property name=“username” value=“system”></property>
<property name=“password” value=“oracle”></property>
</bean>
<bean id=“jt” class=“org.springframework.jdbc.core.JdbcTemplate”>
<property name=“dataSource” ref=“ds”></property>
</bean>
<bean id=“dao” class=“com.javatpoint.dao.EmpDao”>
<property name=“template” ref=“jt”></property>
</bean>
</beans>
empform.jsp
<%@ taglib uri=“http://www.springframework.org/tags/form” prefix=“form”%>
<%@ taglib uri=“http://java.sun.com/jsp/jstl/core” prefix=“c”%>
<h1>Add New Employee</h1>
<form:form method=“post” action=“save”>
<table >
<tr>
<td>Name : </td>
<td><form:input path=“name” /></td>
</tr>
<tr>
<td>Salary :</td>
<td><form:input path=“salary” /></td>
</tr>
<tr>
<td>Designation :</td>
<td><form:input path=“designation” /></td>
</tr>
<tr>
<td> </td>
<td><input type=“submit” value=“Save” /></td>
</tr>
</table>
</form:form>
empeditform.jsp
Here “/SpringMVCCRUDSimple” is the project name, change this if you have different project name. For live application, you can provide full URL.
<%@ taglib uri=“http://www.springframework.org/tags/form” prefix=“form”%>
<%@ taglib uri=“http://java.sun.com/jsp/jstl/core” prefix=“c”%>
<h1>Edit Employee</h1>
<form:form method=“POST” action=“/SpringMVCCRUDSimple/editsave”>
<table >
<tr>
<td></td>
<td><form:hidden path=“id” /></td>
</tr>
<tr>
<td>Name : </td>
<td><form:input path=“name” /></td>
</tr>
<tr>
<td>Salary :</td>
<td><form:input path=“salary” /></td>
</tr>
<tr>
<td>Designation :</td>
<td><form:input path=“designation” /></td>
</tr>
<tr>
<td> </td>
<td><input type=“submit” value=“Edit Save” /></td>
</tr>
</table>
</form:form>
viewemp.jsp
<%@ taglib uri=“http://www.springframework.org/tags/form” prefix=“form”%>
<%@ taglib uri=“http://java.sun.com/jsp/jstl/core” prefix=“c”%>
<h1>Employees List</h1>
<table border=“2” width=“70%” cellpadding=“2”>
<tr><th>Id</th><th>Name</th><th>Salary</th><th>Designation</th><th>Edit</th><th>Delete</th></tr>
<c:forEach var=“emp” items=“${list}”>
<tr>
<td>${emp.id}</td>
<td>${emp.name}</td>
<td>${emp.salary}</td>
<td>${emp.designation}</td>
<td><a href=“editemp/${emp.id}”>Edit</a></td>
<td><a href=“deleteemp/${emp.id}”>Delete</a></td>
</tr>
</c:forEach>
</table>
<br/>
<a href=“empform”>Add New Employee</a>
Output
Click on “Add New Employee” link, you will see following form.
Fill data and click on save button. You will see employees list.
Now click on “edit” link, a form will appear with the data.
Now change the data of the form and click on “edit save” button.
Now click on “delete” link, you will see employees list with deleted record.


 The
The 

 Select Getter and Setter, then in the dialog that displays, select


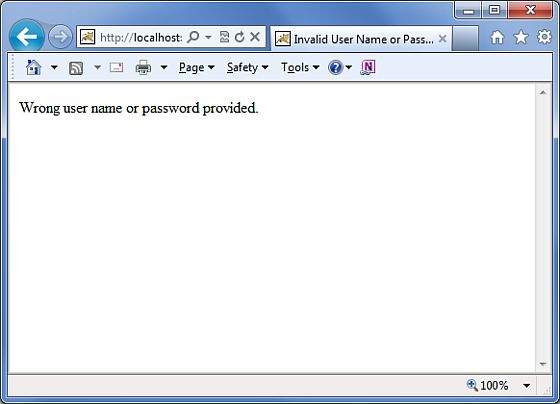
 When you click Login, the login form page redisplays, containing an error message: